3 Tips On Sharing Content For Reluctant Twitter Users
I’ve encountered a recent phenomenon of people who are new to using Twitter. Some are businesspeople who feel they need to use it but don’t quite embrace it. Some are employees of companies who are asked to share content on behalf of the company but don’t use it for much else. Then there are others who have been told they should be using it but are not comfortable as compared to other social media platforms.
These people are what I consider “reluctant” Twitter users. I’d like to offer them – and everyone else – some straightforward strategies to gain familiarity and comfort with this social network.
Let’s start with simply sharing content from others. When it comes to sharing content on Twitter, I offer 3 tips to help you through the process. But first, let’s define what “sharing” is. It is the process of posting, or tweeting, information you want to inform others of. It could just be the text of a tweet, a link to a Web page, a picture, or a combination of all of these.
These tips are:
1. Identify something of interest to share with others – Where this may be obvious to some of you reading, I know for others it is not. There is no “perfect” content – it can be any of the formats mentioned above.
When you think of who to share with, I am referring to the people who are following you, plus any Twitter users, providing your profile is public. As for the latter, people can search all tweets (known as the public timeline) for any topic they are looking for. They may find one of your tweets, and could like or retweet it, thus sharing it to their followers. So when you see someone you don’t know like something of yours, this extension to your network is why.
2. Use the Tweet button – Now that you have identified what, how do you actually share it? The ideal way is by clicking a button or link which will open up a text box and format a tweet for you. With Twitter now being around for over a decade, most Web sites, news media, blogs, etc. have such a link or button, as well as sharing buttons for other social media platforms (e.g. Facebook, Pinterest).
That being said, there are many sites that do not offer such a button (like here at The Hot Iron). For these, you can simply copy and paste a link into the box when you go into type your tweet. You also can use built-in sharing functions on your Web browser or mobile devices to compose a tweet.
3. Personalize it – Before you press the tweet button, personalize what you sharing. Personalizing allows you to add your point of view, your reason, your whatever to what you share. Personalization can also include the Twitter username of someone to send the tweet to as well as a personal message to them or anyone else reading it. You can also take personalization to the next level by adding keywords or hashtags (keywords preceded by the # symbol) to what you write, as people may be searching Twitter for content with these words.
Like with anything, start someplace and the more you do it, the more comfortable you will be. Following these 3 tips will hopefully make this as easily done as said. The next time you find an article or anything else you want to share on Twitter, try these tips and let me know if they work for you or not.
Deconstructing Tweeting Content
Sharing content is at the core of the term social media – being out there and social by sharing content from a media source. Any new activity takes time – more for some than others – but with practice you will get comfortable. Having some guidelines can help you get over the hump. In time, you will gain a level of savviness with using Twitter.
This is from The Hot Iron, a journal on business and technology by Mike Maddaloni.
Did you enjoy this? Subscribe to The Hot Iron by RSS/XML feed or Read by Email.
Blogging • Business • Social Media • Strategize • (0) Comments • Permalink
Why I Don’t List My Birthday On LinkedIn
Happy Birthday! Or should I say, Happy Birthday?
When you hear those words, what do you think of? A child’s birthday party? A co-worker gathering for birthdays for the month? Or a recurring line from a Christmastime cartoon?
Or perhaps do you think of an onslaught of people, some you may not even know well, sending you those 2 words in a rote fashion over a social media platform?
It is for this latter reason why I don’t list my birthday on LinkedIn.
Sincerity vs. Obligation
Adults have a variety of traditions when it comes to their birthdays. Some don’t acknowledge them at all, some dog you with it like it’s a national week of celebration, and most are somewhere in between. For myself, my immediate family will acknowledge it, I get a few messages from those cousins who keep track of everyone’s birthdays, and that’s it. And I am fine with that.
As social media platforms have evolved, they have asked for more and more information about you. This includes LinkedIn, which most regard as business social media platform and, ideally, above the fray of such frivolity. However, that’s not the case, as they ask for the date you entered this mortal coil. Capturing this in their databases, now owned by Microsoft, is not the extent of it, as they now share your birthday with your connections on that unique day – as you go through your feed seeing who has a new job or work anniversary, you will also see who is marking the day as surviving another year on this planet.
This compels people to “like” or go as far as to wish you a Happy Birthday with a canned greeting. On occasion someone, likely a person who actually knows you, may put a more personalized greeting, but for the most part the obligatory methods are the ones which are used. On the surface this may seem nice – look, everyone’s wishing me a Happy Birthday – but it is insincere, and for some, intrusive, as many people don’t like it highlighted.
Just Say No As I Do

If you want to rise above the fray of the frivolity of empty birthday greetings on LinkedIn, there are 2 steps you need to follow. First, don’t list your birthday. Under your contact info on your profile page, simply remove your birthday, as shown above. Second, you can turn off notifications of those who still have their birthday listed on the social platform, so you won’t be inundated with requests to wish them something that may not want to hear. The image at the top of this post is what this looks like on the LinkedIn notifications page.
But Wait, What About in The Name of CRM?
As some of you are reading this, you may be thinking I am missing the point of why LinkedIn is asking for this information to begin with. My guess is some of you who are in sales or have businesses may think birthdays are a great way to engage with customers and provide an added level of personalization, and taking their birth date from LinkedIn to your own customer relationship management system is a natural step.
Think again. Just because someone has their birthday listed on a social media site, it’s not because they consciously entered the information. Other social media platforms like Facebook and Twitter ask for more information than – if you think about it – you should comply with. Entering your birthday may be as natural as entering your email address or even your name, as you don’t think twice about it. Just because it’s listed there for a person, don’t assume you personally have permission to do with that data what you will. The platforms likely have it covered in their terms of use though. The best way to alleviate this is to just not do it.
Deconstructing Birthdays in LinkedIn
Birthdays are personal. Sending birthday greetings to a person you do not know well, just because you saw they entered their date onto a social media platform, can be awkward. Especially when using a business-focused social platform like LinkedIn, pause should be taken when acknowledging or using this information, as the person who entered it may not be aware of how it would be used or shared.
Do you have your birthday listed on LinkedIn? On other social media platforms? I welcome your thoughts on this in the comments to this post.
This is from The Hot Iron, a journal on business and technology by Mike Maddaloni.
Did you enjoy this? Subscribe to The Hot Iron by RSS/XML feed or Read by Email.
Business • Social Media • Strategize • Technology • (2) Comments • Permalink
2 Ways to Export Your LinkedIn Connections And Information
![]() With the news this week of Microsoft acquiring the business social media site LinkedIn for US$26.2B, the first thought I had was, “gee, when was the last time I exported my LinkedIn connections and information?”
With the news this week of Microsoft acquiring the business social media site LinkedIn for US$26.2B, the first thought I had was, “gee, when was the last time I exported my LinkedIn connections and information?”
As you read that, you may have thought, “gee, I can export my LinkedIn connections and information?” Yes you can, and if you didn't know that 1) you are not alone, as many people are unaware of this, and 2) you still can do it, and I'll show you how.
After all, they are your connections
As you have built your connections and updated your information in LinkedIn, you have compiled a wealth of data over time. For many of your connections, you may not have their business card or any other record of them outside of the site. With LinkedIn's messaging service, you may have been in communication with someone without ever sending them a regular email message. Many people also keep their LinkedIn profile more current than their resume.
With the reality of our reliance on Web services like LinkedIn, this is not surprising. Fortunately they also offer the ability to export key data – your connections and other information it has collected on you, such as your profile. If you have never done it, there's no time like the present, and here's the quick and painless steps to execute these not-so-obvious functions.
Exporting LinkedIn Connections
Whether you have a handful or 500+ connections (LinkedIn will only show you the true number you have and nobody else for some reason), you have the ability to export them. When you perform an export, key information you'll get is name, current employer and title and email address, as most everybody has this information on their own profile. Name and email is in my mind most important as you have a way to reach them.
Here's the steps to follow to export connections.
1. Log into LinkedIn using a Web browser and select Connections from the My Network menu.
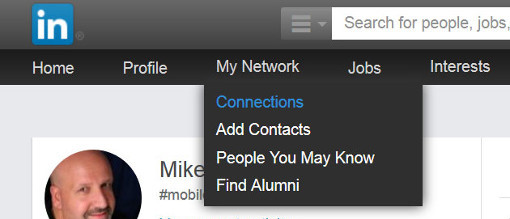
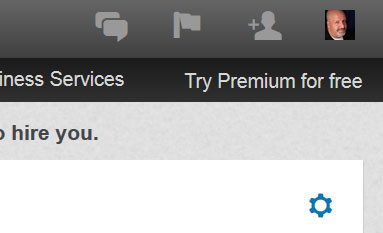
2. Click the gear icon for Settings on the right side of the screen.
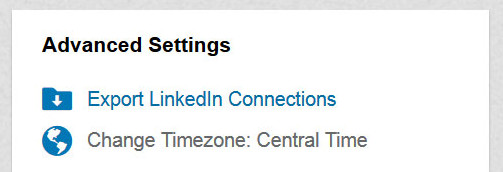
3. Click the link “Export LinkedIn Connections” on the right column on the screen.
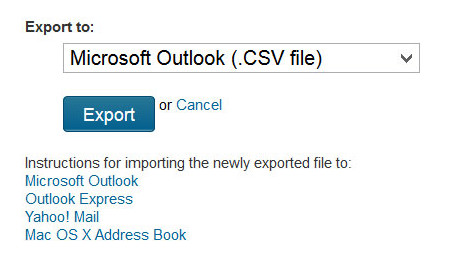
4. You have the option to select the format you want your connections in. I have always selected “Microsoft Outlook (.CSV file)” as this gives me a delimited file I can easily open in Excel or Open Office. The other formats may better suit for importing into another program or Web service. Once you select your desired format, click the Export button.
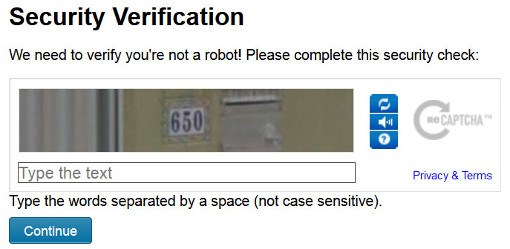
5. You will be prompted with a CAPTCHA for a “security verification” to ensure LinkedIn that you are a real human being requesting your contacts. Enter the CAPTCHA value and click the Continue button.
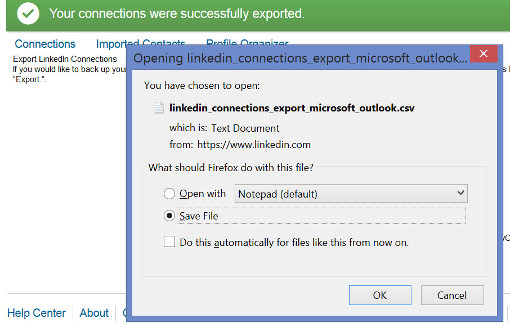
6. You will get a popup in the browser to save or open the file (the actual appearance of this will vary by browser). Make your choice, in this case I am going to save it.
7. Open this file in Excel or your favorite spreadsheet and you can browse and process your contacts.

What you do with your contacts is of course up to you. Even if you have no immediate plan – or time – to do anything with them right now, you at least have a backup of the contacts your spent a long time curating.
Exporting LinkedIn Information
In addition to your contacts, you have profile information and activity performed on LinkedIn, such as messages, etc., which you can export as well, though you may have to wait at least 24 hours to get it. This is probably due more to load on their servers than an element of control (I hope!), but within a day you can get it all, and here's how to request and receive it.
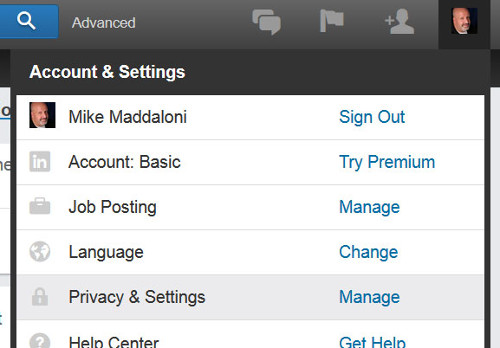
1. Click on your picture icon at the top right of the screen and select “Privacy & Settings / Manage” from the menu.
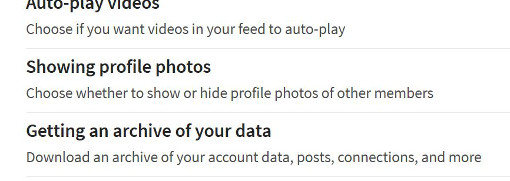
2. Scroll down the page and click the “Getting an archive of your data” link.
3. Click the button labeled “Download” on the right side of the screen.

4. Wait. The message on the screen will say you will receive an email within 24 hours. In this case I got 1 email with a partial file within a short period of time, and then within a day I got a second email with a link to the entire archive of information.
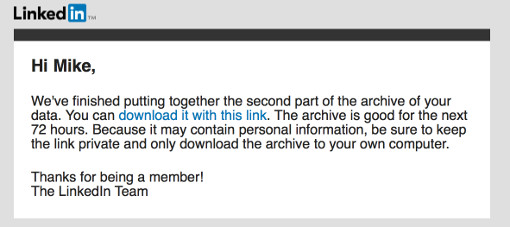
So what's in this archive Zip file? In addition to any images you have posted (your profile picture, banner, etc.) there are several delimited files in CSV format with everything from profile information to what you have searched on. Take a look!
Again, what you do with this – and when – is up to you, but it is yours, and now you have it in your digital hands.
Deconstructing Data Exporting
Since LinkedIn launched in 2003, many, including myself, assumed the service will always be there, every time we want it, as it has been. In the recent past it has added and even removed features, like Answers, where many posted a lot of information. Where it's their platform, at least they realize it is your information and make it available to you. With the unknown of the future, plus a future under Microsoft's ownership, why not get a copy of your LinkedIn information today?
This is from The Hot Iron, a journal on business and technology by Mike Maddaloni.
Did you enjoy this? Subscribe to The Hot Iron by RSS/XML feed or Read by Email.
Build • Business • Social Media • Strategize • Technology • (5) Comments • Permalink
Easily Create A UNO Social Site With Free .UNO Domain Name
Personal Web sites are nothing new. Where they started in the early days of the Web – I created my first one in 1994 – they became more popular and pervasive with improved Web publishing tools. Technical knowledge is not even required for most of them, and there are a variety to choose from. So when I heard of UNO Social Sites, I wondered why another brand? When I tried it out and created my own, I found what could be the best way for people of all tech levels to make one.
UNO Social Sites are offered by the .UNO registry, which began offering the .UNO domain name last year when dozens of new global top-level domains (or gTLDs) were made available for registration, I wrote then why I registered my own .UNO domain names and what I felt were the compelling reasons to do so. My intent was to use my domain name, maddaloni.uno, as my personal home page and build a site there. I never did (the domain name now points to this blog), but still wanted to. I don’t need to worry about that as now the .UNO registry has created UNO Social Sites, which are easy to create and customize personal Web sites.
As I mentioned in the above-linked article, I know the people behind the .UNO registry, and they invited me to beta test the service before it went live. After trying it, creating my own site and testing it all, UNO Social Sites, at hello.uno, are now live for anyone to create one, plus get a .UNO domain name… for free. Where some may want this solely because it is a free service that comes with a free domain name, the site you can build is solid and offers some great features. Once you create your account and choose your domain name, you are free to add a variety of information, pictures and feeds to your site.
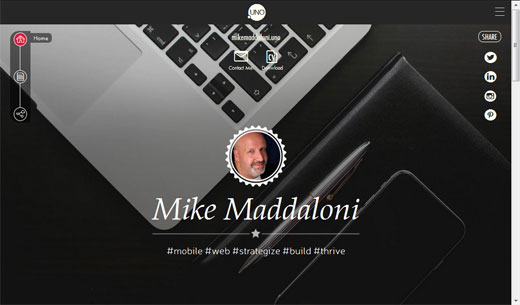
In order to create a UNO Social Site, you need a Facebook account. As I don’t use Facebook personally, I inquired why and was told this is solely for verification of your identity. As you can see from my own page pictured above at mikemaddaloni.uno there is no link to Facebook for me, as I was able to use a Facebook account I created solely for this purpose.
Among the features of the site you can customize are the following:
- Name, photo, tagline, “about me” description
- Background photos – 1 or up to 3 that rotate
- Responsive site templates, which means they size nicely for large and small screens, and within them choices of fonts, text sizes and colors
- A contact link which will send an email to you, as well as an email forwarding address using the domain name
- A link to your CV or resume which you can upload as a file
- Links to your chosen social media feeds, and a snapshot of those feeds
- Something called “My UNO Moments” where you can create a custom collage of photos and text
If all of these customization options are too much for you, coming soon Is the ability to create a page from information on your Facebook page with simply a couple of clicks.
With the variety of customization options, you can create a site with either a social or business focus. Though called “social” sites, you could create a site that is solely for your job search or business, with links and feeds just to LinkedIn, for example. Otherwise you can have it as a multipurpose one as I do for both personal and business. Having the link to your CV or resume upfront is a handy feature, and good way to share more on your profile when exchanging information with a prospect client or job recruiter.
There is also an option to explore others who have a UNO Social Site and follow them. I haven’t used this much other than to see how others have configured their sites, and it has given me some good examples. From what the people at the .UNO registry have told me, these are just the beginning of features and more will be offered in the future. You can see how to setup a site with the video embedded at the bottom of this post, or link here to view it on YouTube.
If you do not have a personal site, or do have one but may want a new approach to one, I recommend getting an UNO Social Site. Whether you have created one, or not, I welcome your thoughts on it in the comments of this post.
This is from The Hot Iron, a journal on business and technology by Mike Maddaloni.
Did you enjoy this? Subscribe to The Hot Iron by RSS/XML feed or Read by Email.
Build • Domain Names • Mobile Technology • Social Media • Technology • Thrive • Web Design • Web Development • (0) Comments • Permalink
Personify Plus Literally Put Me In Front Of The Class
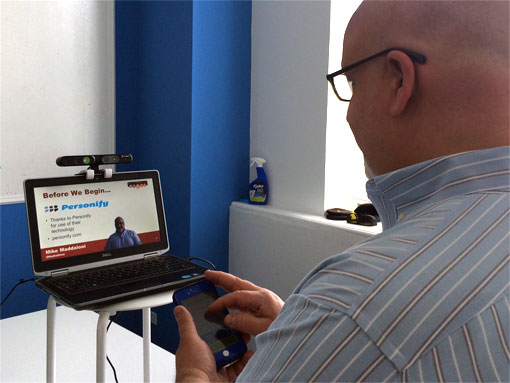
Going into my recent guest lecture on blogging at the University of Wisconsin-Oshkosh, I know I couldn’t physically be there. This wouldn’t be a problem for the professor, Dr. Sara Steffes Hansen, as she has had remote guest lecturers in the past using Skype. Though Skype was also a viable option for me, it would not truly represent “me” as I would want it to – both in my presentation style and how I wanted to present my material.
Pondering this, I recalled a presentation I saw by my esteemed colleague Dr. Dietmar Schloesser, where he used a 3D webcam and software and the service from Chicago-based Personify where he literally “inserted” himself into his PowerPoint presentation which he was giving remotely. So I wondered, could I do the same, without adding unnecessary complexity to Dr. Hansen and deliver an engaging presentation to her classes that would be like me being there?
The Next Best Thing To Being There
Leading up to the lecture, I reached out to Personify and asked them if I could use their “technology” for the lecture. I use that term in quotes as I really had no idea what was involved in this, and to what extent the effort would be on my part as well as on campus at UW-O in the lecture hall. Thanks to help from Personify’s director of marketing Kira and solutions executive Nick, they explained the extremely straightforward concept, got me setup with their service and allowed me to use their office and one of their 3D cameras, when plugged into my notebook PC, allowed me to interact with the students some 4 hours north of me.
Using Personify Plus is similar to what a TV weatherperson does, where they stand in front of a large green screen, and the effect is that it appears they are in front of whatever image is selected, which is usually weather maps. With Personify Plus, the 3D webcam fulfills the role of the screen, where it isolates you the presenter (or presenters if there are more than one) from the background, then allows the image of you to be literally inserted into whatever presentation or what you put on your screen to share. In this case, I had a PowerPoint presentation. But as you can see from the photo below, I was able to bring up a weather map and use it just as any meteorologist would. Also notice the close-up of the 3D camera and the configuration panel on the left side of the screen.
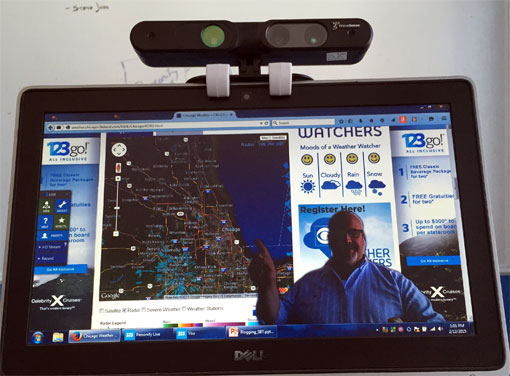
The Personify Plus software consists of a program installed on a PC or Mac that connects to an attached or installed 3D webcam, as well as to the Personify service. These are both intriguing elements of the Personify experience. Going into this, I really was not aware of 3D webcams, but they have been around, and more and more notebook PCs are being sold with them preinstalled. Also PrimeSense, the maker of the camera that Personify let me use, was recently acquired by Apple. Where everyone has been wondering what Apple would be doing with Beats headphones, I am more intrigued into what they could be doing with 3D! Also, the Personify service allows you to not only run presentations with you in them, but to record them as well. There is also a mobile app which, when logged in, serves as a remote control for the service, allowing you to make adjustments to your positioning as well as advance PowerPoint slides.
Putting it all together was very straightforward. Installing the Personify Plus software and mobile app were also easy. When I plugged in the 3D webcam, the drivers loaded, and then there I was, literally on my desktop. To transmit the presentation, I used Join.me, a free (and paid) screen sharing service. This was recommended by the Personify team as it had a much better streaming and video refresh rate than Skype or other services. So I connected with Join.me, went full-screen on my presentation and there I was, standing in the presentation.
I had to make small changes to the layout of my PowerPoint slides to allow for myself to not block any of the content on the individual slides. This process allowed me to rethink some of my presentation and what I was going to say as compared to what I put on the screen. It was my choice to use the lower quarter of the presentation, as I could have had myself be any size, which is a great option to have for just one person or multiple people.
Just As Successful In The Classroom
Where thus far I have talked about the technical and logistical aspects of my presentation using Personify Plus, what I have not mentioned – and what I was equally concerned about – was how it was received in the lecture hall on the Oshkosh campus. Even though I had discussed this fully with Dr. Hansen, she really didn’t know what to expect. And even though I have seen a presentation using all of this, I did not know how giving one myself would be like without the visual feedback you get from the audience, as this can influence what and how you present.
Fortunately, everyone’s expectations were exceeded with Personify Plus. It felt very natural for me to present, and the students in the classroom were engaged with my presentation, almost as if I was there. Feedback from Dr. Hansen was very positive, and so were the reactions from students in the class which they shared with the #uwonewmedia hashtag on Twitter.
The Next Level Of Online Presentations
I have sat through many webinars and other online presentations, and I admit that many times my full attention is not focused on it. Personify takes presentations to the next level not only with inserting the presenter but increasing engagement. I will sit there and watch all of a presentation, especially as the presenter or presenters themselves will also be changing, more like watching a video and not just a stack of static slides. Where I haven’t given another presentation since using Personify Plus, I am eager to, and have thought of other uses for it, everything from creating business videos to comedy and improv – similar to how many movies use green screens for background scenery, you could do the same for local actors on a small budget.
Have you seen a presentation using Personify Plus, or would you want to? I welcome your thoughts in the comments to this post.
This is from The Hot Iron, a journal on business and technology by Mike Maddaloni.
Did you enjoy this? Subscribe to The Hot Iron by RSS/XML feed or Read by Email.
Blogging • Business • Social Media • Technology • Thrive • (2) Comments • Permalink

